It’s Snow Much Crafting! at Pajama Crafter Stamps! Our PCS Design Team is sharing winter inspiration featuring both new release products from our Early Birds and PCS favorites from our Night Owls.
For my card I combined two stamp sets, Wienerful Christmas and Season's Gifting. I decided these two weiner dogs needed to be helping prepare the sleigh, so I cut out the presents that were inside the sleigh and added the two dogs. Just a little creative thinking and a whole new look for your card.
Follow along with the complete hop lineup below for more Snow Much Crafting! inspiration. One participant will be randomly selected to win a $15 Pajama Crafter Stamps store credit! Winner will be announced on the PCS Instagram account.
Don’t forget our Snow Much Crafting YouTube Hop! Visit the Pajama Crafter Stamps YouTube channel for even more winter inspiration and another chance to win $15 store credit!
YOU ARE HERE: @melissaoeters
UP NEXT:@shilomiles
Hop Lineup:
@pajamacrafterstamps
@joywilsonink
@stationarybyjustine
@sandi_powers_creates
@olheiserc
@cardscraftycreations
@anniec09
@manleymademinute
@melissaoeters (you are here)
@shilomiles
@dannisdreams
@createdjust4udesigns
@carrie_leigh_creations
@underapileofpapers
@pajamacrafterstamps
Monday, October 12, 2026
Here Fishy Fishy...
Who says a fun-fold card has to be complicated? This Fishy Fun Fold is super easy to create, but the finished card has plenty of room for a whole underwater scene!
I had so much fun creating this with some of my favorite fishy stamps and stencils all from Pajama Crafter Stamps.
Mother Puffer Don't Be Koi What the Krill? Casted Net Sencil
If you are interested learning more about this card please head over the Pajama Crafter Stamps Community Blog. All the detail are waiting there!
A Little Pumpkin, A Little Turkey, Coffee, and Lots of Fall Fun!
Join us for ‘Fall for Our Favorites Week’ and be inspired by the entire Pajama Crafter Stamps design team each day.
Fall crafting is in full swing, and this card is packed with some of my favorite things about the season—pumpkins, colorful leaves, cozy plaid, a playful turkey, and even a sneaky little ghost!
For this project, I combined three fun stamp sets from Pajama Crafter Stamps: Food Coma Ready,Pumpkin & Spice, and Where My Ghouls At? The combination of fall and Halloween elements makes this card extra fun and unexpected.
Adding a Cozy Plaid Touch
I knew right away that I wanted my coffee cup to have a cozy plaid pattern. Paper piecing was the perfect way to make that happen!
I stamped the cup onto patterned paper from the Autumn Whispers Paper Pack and carefully cut it out. I also stamped the cup onto white cardstock. After gluing the plaid piece over the stamped image, I trimmed around the cup for a perfectly patterned finish.
Building the Fall Scene
Next, I stamped and fussy-cut all my images. I also used theCircle Peek-A-Boo Die, cutting the circle in half to add another fun element to the design.
I colored the stamped images with OLO Markers, using warm autumn shades to bring everything to life. Once all of my pieces were ready, I started layering them together to create a fun, dimensional fall scene.
For the card base, I used brown cardstock along with bright layered rectangles and patterned paper from the Autumn Whispers collection. I added die-cut leaves around the images to fill out the background and give the card that wonderful autumn feel.
I used foam adhesive throughout the design to create different levels of dimension. The cozy plaid coffee cup adds a warm seasonal touch, while the playful turkey definitely steals the show!
And, of course, no fall card would be complete without a fun sentiment. “Give ’em pumpkin to talk about!” was the perfect finishing touch for this cheerful card.
Halloween crafting is always more fun with a little color, a little sass, and a whole lot of personality—and this “Where Are My Ghouls At?” project has all three! All products featured are from Pajama Crafter Stamps!
For this spooky project, I used the adorable All American Stamps to create a witchy girl. The bold Halloween background was created using Spooky Sorbet Halloween paper pad and stamping it with the Creeping It Real stamp. I also used cute pumpkins from Where Are My Ghouls At stamp set, and plenty of classic Halloween colors. The result is a fun dimensional piece that feels playful rather than scary—perfect for celebrating the season.
A Witchy Centerpiece
The star of this project is the adorable little witch in the center. She was stamped onto X-Press It paper and colored with Olo markers. Her oversized round glasses, bright purple pigtails, orange witch hat, and striped outfit give her tons of personality. She even has spider brads on her hair bows. I especially love how the purple and orange color combination pops against the background.
Her little cape is filled with Halloween stars and spooky details, adding even more interest while keeping the overall design cohesive.
A Background with Attitude
Behind the witch, I used the bold handwritten-style Halloween sentiment from the Creeping It Real stamp and stamped this on the tiny pumpkin paper from the Spooky Sorbet Halloween paper pad.
The black lettering creates a great contrast with the colorful focal image and gives the project that fun, slightly sassy Halloween vibe.
The tiny pumpkins on the paper are pink, orange, and purple. This keeps the background from feeling too dark and makes all those little details come alive.
Pumpkins, Pumpkins, and More Pumpkins!
The bottom of the project is finished with a row of illustrated pumpkins from the Where My Ghouls At stamp set. Each stamped pumpkin has its own personality, with cute faces, doodled details, and little touches of orange and gold. The pumpkins were stamped directly on pumpkin-patterned paper from the Spooky Sorbet Halloween collection and fussy cut.
I love using pumpkins as a grounding element on Halloween projects. They instantly say “fall,” while the different expressions make this grouping feel playful and handmade.
The entire design is layered with black and a deep purple border, which ties the purple hair and Halloween palette together beautifully. The layered elements also create a fun dimensional effect, making the witch and pumpkins really stand out from the background.
This project is a great reminder that Halloween cards don't have to be spooky or creepy. You can mix traditional Halloween colors with cute characters, whimsical details, and a little bit of attitude to create something completely your own.
Color Palette
For this project, I focused on a classic Halloween palette of orange, purple, black, white, and pops of pink, with touches of green on the pumpkin stems.
The combination keeps the project bright and playful while still giving it that unmistakable Halloween feel. 🎃🧙♀️👻
Supplies Used
Where My Ghouls At? stamp set from Pajama Crafter Stamps
Creeping it Real stamp set from Pajama Crafter Stamps
All American Stamps from Pajama Crafter Stamps
Spooky Sorbet Halloween 6x6 paper pad from Pajama Crafter Stamps
Kindred Stamps has just released a new collection! Add a touch of French flair to your crafting with this charming and playful stamp set. The adorable French girl takes center stage on both cards. The Bonjour stamp set, along with other new releases for September, is available now!
Scrappy Boy Stamps has once again created some new outrageous Backpack Builder Add-on die sets. These sets are very self-explanatory; you can find the name and link under each one.
This new collection, "Fabulous & Flawed," is hilarious. Scrappy Boy has once again captured the essence of the old TV show. I must comment on the sentiments in this stamp set; there are so many fantastic ones! You say potato, I say Vodka!
The next two photos show each side of this adorable 3D Posh Little Bag die set. Each character has her own side with her own coordinating paper.
You can probably guess which TV series inspired this collection, Professionally Unhinged. From the office background stamp to the world's best boss Coffee Mug die set, this collection is fantastic.
Sometimes a handmade card needs to say exactly what we’re thinking—and sometimes a little sarcasm is the perfect way to do it! This fun card combines the Back the Blues…
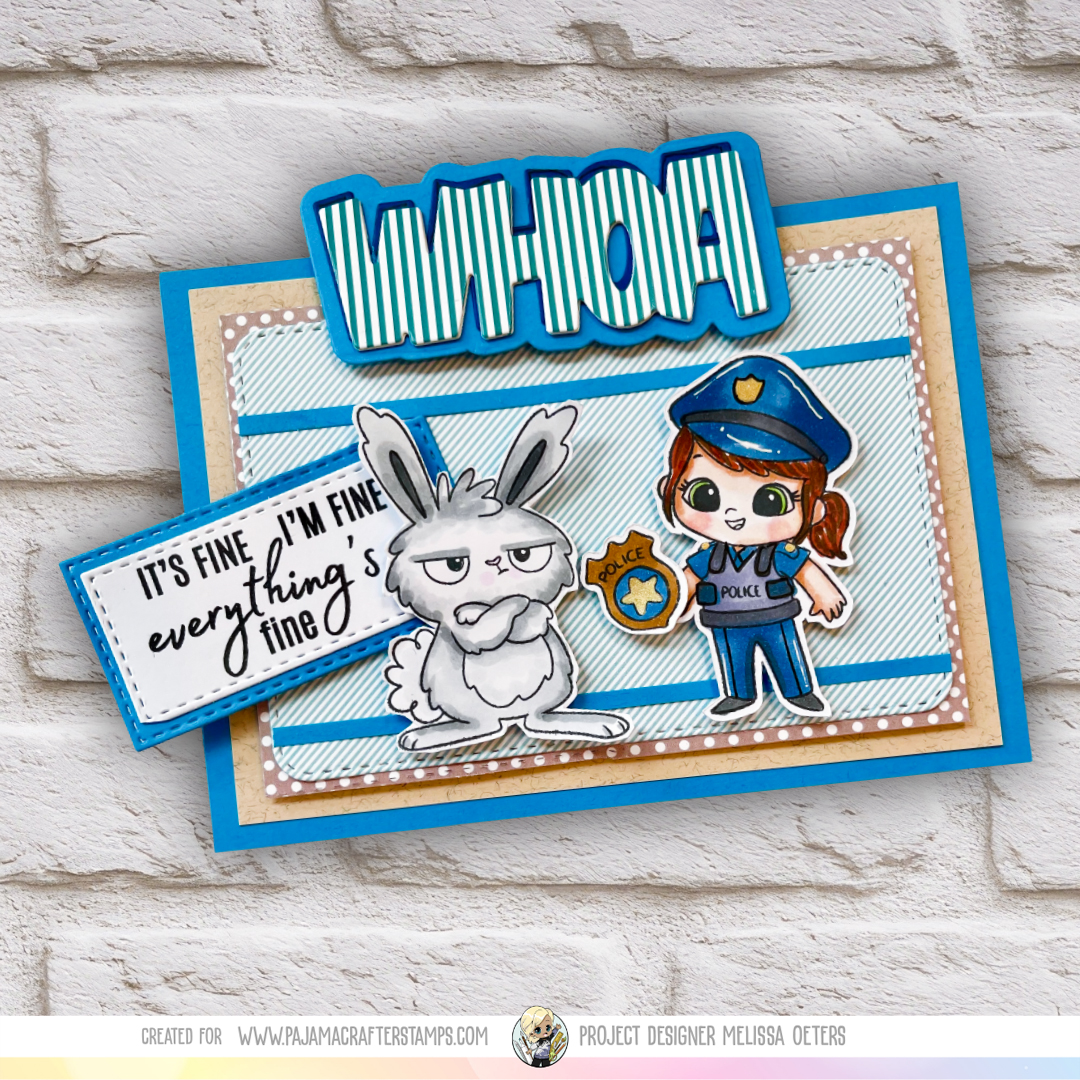
Sometimes a handmade card needs to say exactly what we’re thinking—and sometimes a little sarcasm is the perfect way to do it! This fun card combines the Back the Blues and Funny Bunnies stamp sets with a bold sentiment from You Are stamp set and the Dang, Whoa, Yikes word and shadow die set.
The star of the card is the grumpy little bunny. With his crossed arms and unimpressed expression, he pairs perfectly with the sentiment, “It’s fine, everything’s fine.” Add in our adorable police officer, and you’ve got a card that’s equal parts cute, cheeky, and encouraging.
Creating the Background
I started by building the card base with layers of coordinating blue and patterned papers from the Savana Neutrals paper pad and the #100 Heavyweight Pebbled Beach cardstock. The combination of cardstocks, soft neutral tones, and striped and polka-dot patterns gives the card plenty of visual interest without taking attention away from the stamped images.
Bring on the Bunnies!
The Funny Bunnies images are perfect when you want a little personality on your card. I stamped the bunny and colored him in soft shades of gray, keeping his coloring simple so his expression could really shine.
And that expression? Absolutely perfect!
His crossed arms and skeptical look make the sentiment even funnier. Sometimes the image and sentiment don’t have to match literally—they just need to work together to tell a story.
A Little Blue Goes a Long Way
The Back the Blues images add another fun element to the design. I colored the police officer in traditional blues and added the coordinating badge for a pop of detail.
I also used the Dang, Whoa, Yikes word and shadow die to create the large “WHOA” element at the top of the card. The bold lettering, striped paper, and bright blue shadow make it impossible to miss.
Don’t Forget the Sentiment
For the main sentiment, I used the You Are stamps to create a playful message that fits the personality of the card.
The handwritten-style portion of the sentiment adds a nice contrast to the bold “WHOA” die-cut. Mixing fonts and lettering styles is one of my favorite ways to make a handmade card feel more dynamic.
Add Some Dimension
To finish everything off, I popped several of the elements up with foam adhesive. The raised bunny, police officer, sentiment, and large “WHOA” give the card plenty of dimension and help each element stand out.
The result is a cheerful, slightly sassy card that’s perfect for someone who could use a laugh—or simply a reminder that everything really is fine!
Supplies Used
Back the Blues Stamp Set from Pajama Crafter Stamps
Funny Bunnies Stamp Set from Pajama Crafter Stamps
You Are Stamp Set from Pajama Crafter Stamps
Dang, Whoa, Yikes Word & Shadow Dies from Pajama Crafter Stamps
Savana Neutrals paper pad from Pajama Crafter Stamps
#100 Heavyweight Pebbled Beach cardstock from Pajama Crafter Stamps
Olo markers
3D Foam adhesive
Whether you’re making a card for a friend, a police officer, or someone who just needs a little encouragement, this design is a fun reminder that a handmade card doesn’t always have to be serious. Sometimes you just need a grumpy bunny, a little blue, and a whole lot of “WHOA!”
Sometimes a handmade card needs to do more than say “hello.” It can be a little reminder of just how amazing someone is—and that was the inspiration behind this colorful,…
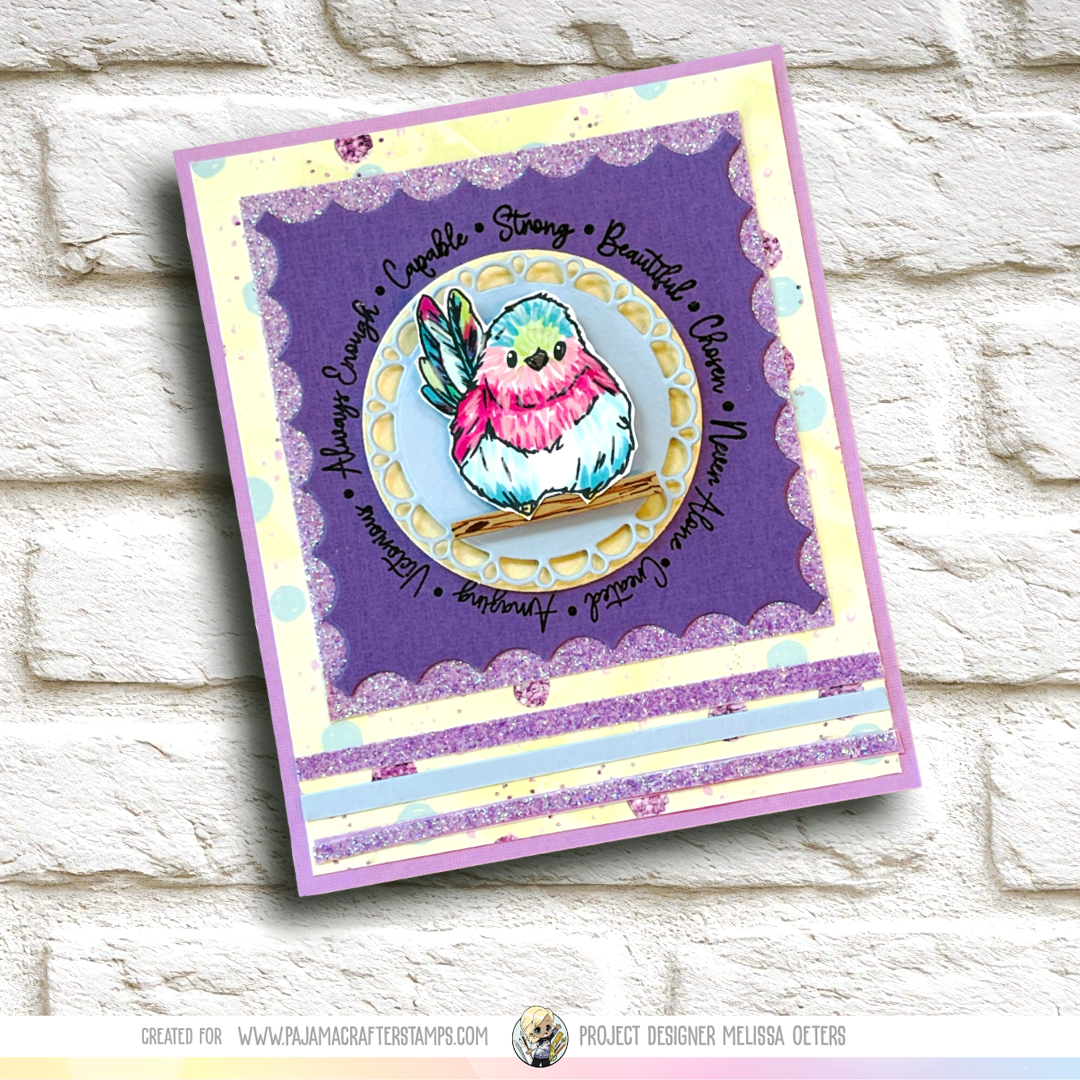
Sometimes a handmade card needs to do more than say “hello.” It can be a little reminder of just how amazing someone is—and that was the inspiration behind this colorful, sparkly card featuring the sweetest little bird from the Birds of a Feather stamp set.
I wanted this card to feel cheerful, encouraging, and a little bit whimsical. The combination of soft pastels, bright pink and turquoise, purple, and plenty of sparkle creates a fun design while keeping the sentiment at the heart of the card.
A Little Bird With a Big Message
The focal point of this card is an adorable bird perched on a branch. I colored the image with bright, playful shades of pink, aqua, yellow, and purple, giving the bird plenty of personality. A few colorful feathers add an extra pop of color and help draw the eye toward the center of the design.
I placed the bird inside the Scalloped Circle die, which gives the focal image a finished, almost medallion-like appearance. The dimensional layers also help it stand out from the purple background.
I stamped out the circle sentiment stamp from You Are stamps and decided I only wanted to use the outermost circle of words around the bird. Using a circle die from my stash and measuring it against the Scalloped Circle die I was able to make that happen by layering paper over the center. This card still creates a positive affirmation, which is a perfect card for someone who could use a little extra encouragement.
Layers, Sparkle & Texture
The card base is framed with a soft pink border, followed by a pale yellow patterned layer. The purple center panel provides a wonderful contrast to the colorful bird and makes the glitter accents really pop.
One of my fancy details is the scalloped glitter border around the purple panel. I continued the sparkle through the lower portion of the card with several horizontal strips in coordinating colors. These little details add texture and movement without competing with the focal image.
A sprinkling of glitter throughout the design gives the finished card that extra bit of magic.
Finishing Touches
For the bottom of the card, I layered strips of pastel blue and glitter cardstock. The varied widths keep the design interesting while visually grounding the larger focal panel above.
The result is a bright and happy card that feels like a little celebration in paper form.
Supplies Used
Birds of a Feather Stamp Set from Pajama Crafter Stamps
You Are Stamp Set from Pajama Crafter Stamps
Scalloped Circle die from Prickley Pear
Cardstock
Glitter paper
3D Foam adhesive
Whether you’re making a card for a friend, a loved one, a teacher, or simply someone who needs a reminder of their own strength, an encouraging handmade card is a wonderful way to let them know they’re special.
You are strong. You are capable. You are beautiful. You are brave. And you are wonderful.
August was throwback month at Kindred Stamps. I was excited to play with the fang-tastic stamp set Ghoul Girls! I also used additional Kindred Stamps goodies - Card Basic Die Set, and Spooky Hotel Paper Pack. I loved coloring them so each had their own personality.
With these adorable costume pieces, Monster Bubu can transform into all kinds of spooky characters. Dress him up as a vampire, a spooky skeleton, or a cute mummy—the possibilities are perfect for Halloween cards, scrapbook pages, decorations, and more.
The Halloween Costumes Monster Bubu Add-On Die Set makes it easy to give your Bubu a whole new Halloween personality. Add pumpkins, spooky details, costumes, and accessories to create a project that is uniquely yours.
Whether you love cute-and-spooky or full-on Halloween fun, Monster Bubu is ready to celebrate!
Thursday, September 3, 2026
It's Super Spooky Season at Pajama Crafter Stamps! Our Super Spooky Season Inspiration Hop features creative projects from the PCS Design Team. Our Early Birds are showcasing products from the newest release, while our Night Owls are sharing fresh inspiration using previously released PCS favorites. We also have a YouTube Hop going on on the Pajama Crafter Stamps Channel!
A Halloween fish bowl? Yes, please! 🎃🐟 I created the bowl with circle dies and added some spooky die cuts. I used the Don’t Be Koi stamp set and colored the fish with OLO markers. After assembling the bowl with 3-D adhesive, I added movement with Dylusions Turquoise Spray and Ranger White Acrylic Spray. The sentiment is from the Where My Ghouls At stamp set.

.png)